Camping
DIY Backpacking Quilt
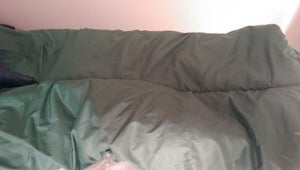
Hello again! As promised from the blog entry on my DIY sil nylon tarp, I’m back to report (happily) on my DIY backpacking quilt, which weighs a fraction of what a sleeping bag does and packs down splendidly. After the tarp build, this was a relatively simple project. Of course, that’s if you don’t count the days I lost by having to undo a healthy portion of what I’d done due to one teeny (read: huge) miscalculation. Also important to note is that this is for synthetic insulation and not down.
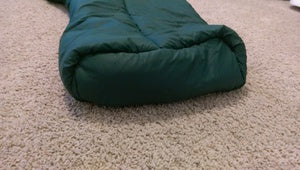
This quilt is pretty much no-frills. I created a 3D footbox instead of putting a drawstring in the foot end or just sewing the ends together to make a simple pocket. This way it can be opened and closed as the temperature warrants. A lot of people put a drawstring on the head end as well to eliminate drafts, but I found that unnecessary. Plus, considering that quilts are designed to be used in conjunction with a bivy sack, a “sleeping clothes” system, or both, I just skipped it. I designed this as a 3-season quilt. If it were just a summer quilt, I would probably do the drawstring footbox so that it could be cinched up for cooler temps or opened up just like a blanket for warmer nights. I’d also use more lightweight insulation.

Designing the Pattern
You can get as intricate as you want on your design, but essentially you are just sandwiching a layer of insulation between two pieces of fabric. I created and used a pattern so that I wouldn’t have to measure everything again for the next quilt I make. (When designing your pattern don’t forget seam allowances!). I ordered my materials from Thru-Hiker because they have convenient and reasonably priced bundles of both the fabric and the insulation together. Don’t confuse these bundles with the kits that come with instructions. They are very different.
To build the quilt, I first cut the insulation, then the liner, then the outer fabrics. I laid them out so that what would become the visible sides (or outside of the quilt) were facing each other. Next I pinned the insulation to the fabrics. This was easy. All I did was place it on top of the two layers and pinned all of the edges except the head end (three sides total). Then it was off to the sewing machine to sew the three layers together on those three edges, leaving the head end not sewn. Lastly all you need to do is just turn it inside out and poof, you’re 80% done!

Cutting the Materials
The Body Seam Sewn Up to the "V"
Now you’ll sew the body seam from the foot end up to the "V" where the quilt fans out. This is what makes it different than a sleeping bag. Instead of a zipper, there is an open V shaped seam. You’ll want to sew the footbox of your quilt next.

Footbox Pattern
Using the same technique used for the body, lay the outward facing portion of the fabric towards each other and then sew the seams. With this, you may just sew all of the edges at once. Be sure to leave a healthy seam allowance to make it easier to sew the footbox onto the end of the quilt. Once you’ve sewn up the footbox, make sure none of the insulation is bunched up, then pin it to the bottom of the quilt and sew it up. I tucked the messy edge, folded it over, and laid down another stitch so that it looked more polished, since this is the only seam you’ll sew that won’t be hidden inside. And that’s it! You’re done!
Of course, there are details that are outside the scope of this article. Perhaps one day I’ll put it all together in a how-to article, but for now just know that you can do this. Seriously. As I mentioned in the tarp blog, if I can do this, so can you. Sewing is easy once you get the hang of it, and you don’t need a fancy machine to do it. I have an old 1976 Kenmore portable. Quilts like this sell for $150-300. The materials, including shipping, ran me $90. This could easily be sewn in a few short days or one long session. The forums that were invaluable to me were backpackinglight.com and thru-hiker.com. The people are generous, enthusiastic, and knowledgeable. Details on how to measure for a custom fit, what materials to use, footbox options, drawstring options, and so much more can all be found there. Good luck, and have fun with it. See you on the trail.

Dave Morales resides in the sometimes sunny PNW. He makes everything from backpacking gear to music equipment to beer.